≡ Menu

Thanksgiving Twitter Chat

Just a reminder that tonight is the VegNews Thanksgiving Twitter chat.  Here’s the link to find out all the details.

Hope you can join us! (You don’t need a Twitter account to do so!)

More Thanksgiving recipes coming up soon.  Stay tuned for the Loaded Mashed Potatoes, Lime-Braised Cranberries, and Pumpkin Tiramisu, among others…

{ 0 comments }

Deconstructed Green Bean Casserole

The traditional green bean casserole found on many dinner tables on Thanksgiving takes a lot of ridicule.  And it’s no wonder, considering that the original recipe calls for canned mushroom soup, canned green beans (although there is a frozen green bean version), and canned fried onions. The resulting casserole, although it has a certain retro comfort food appeal, is not the healthiest, nor is it the tastiest, if what you want to taste are green beans as opposed to sodium.

I’ve created many healthier versions of the casserole, using fresh green beans and healthier sauces — one recipe even uses pureed white beans in the sauce.  But it still remained a casserole, and the green beans, while tasting much better, still didn’t shine as much as they deserved. That’s why this year, I’m deconstructing the venerable casserole.

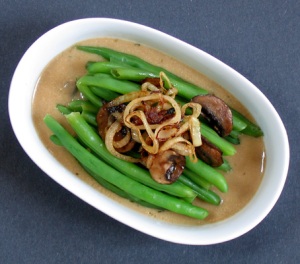
I know a lot of people roll their eyes at the whole “deconstruction” thing, but it’s a perfect way to describe this dish.  Essentially, I’ve taken the elements of the casserole: the green beans, mushrooms, sauce, and onion rings (in this case, shallot rings) and let each element stand on its own, allowing you to combine at will.  For my own part, I’ve enjoyed sampling each flavor on its own, as well as taking various bites that included a little of all or most of the elements.

I’ve provided two ways to cook the green beans initially — the more traditional steamed method which brings out the wonderful natural flavor of the beans (just be sure to watch them carefully as they can go from too firm to too soft in a matter of seconds.)  I’ve also included the option of roasting the green beans before adding to the “casserole” — roasting give the beans a totally different character, both in terms of flavor and texture.
To give you an idea of how they look, the photo above in the casserole dish shows the steamed beans, while this is a photo of the roasted beans:

And this photo shows a portion of steamed beans served in a very frou-frou manner, flanked by its own little bowls of mushrooms sauce and crispy shallot rings — just in case there’s anyone who wants to serve their Thanksgiving dinner in separate courses (!).  Probably not the best way to serve a table full of hungry people. 😉  (and can you just imagine the pile of dirty dishes???)
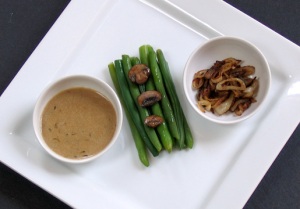
Here’s the recipe:

Deconstructed Green Bean Casserole
Note: Instructions are provided for either roasting or steaming the green beans.
1 1/2 pounds fresh green beans, trimmed
3 medium shallots, cut into thin rings
1 tablespoon olive oil
6 ounces mushrooms (cremini or shiitake are good), sliced
1/2 cup minced onion
2 garlic cloves, minced
1/2 teaspoon dried thyme
1/4 teaspoon dried marjoram
3 tablespoons all-purpose flour (or gluten-free flour)
1 cup mushroom broth (use a porcini or other mushroom bouillon cube)
1 cup plain unsweetened nondairy milk
Salt and freshly ground black pepper
Preheat the oven to 425°F. 
1. To steam the green beans: Place the green beans in a steamer pan over boiling water. Reduce the heat to a simmer and cook until the green beans are just tender. Remove from the steamer and set aside.
To roast the green beans: Spread the green beans in a single layer on an oiled rimmed baking sheet. Drizzle with a little olive oil and roast until tender, about 30 minutes, turning once about halfway through. Set aside.
2. Arrange the shallots on an oiled baking pan and roast until golden brown, about 20 minutes, turning once about halfway through.
3. Heat the oil in a large skillet over medium-high heat.  Add the mushrooms and saute until softened and slighted browned.  Remove the mushrooms from the skillet and set aside.  In the same skillet, over medium heat, add the onion, cover, and cook until softened, about 5 minutes.  Add the garlic, marjoram, and thyme.  Stir in about half of the reserved mushrooms and sprinkle with the flour. Stir in the broth, stirring to thicken.  Stir in the nondairy milk and simmer, stirring, until thick, about 5 minutes. Season to taste with salt and pepper and transfer to a casserole dish. 
4. Arrange the reserved mushrooms on top of the sauce, then arrange the green beans on top of the mushrooms, with the roasted shallot rings on top.  Serve hot.  If making ahead, the casserole can be refrigerated and then covered and reheated in the microwave or the oven until hot.   
Serves 4 to 6
There’s lots more coming up in the next week to help you make a delicious and cruelty-free Thanksgiving meal that everyone will enjoy.  For another amazing side dish, check out my recipe on OneGreenPlanet for Roasted Sweet Potatoes and Crispy Kale Ribbons, complete with a holiday variation. (Please “Like” this recipe on OneGreenPlanet, and share it with your friends on Facebook and Twitter.
SPECIAL ANNOUNCEMENT: I will be participating in the VegNews Twitter Chat tomorrow night at 6pm PT/9pm ET. Join Julie Hasson (@everydaydish), Annie Shannon (@AJShannon), and me (@GlobalVegan). Let’s chat turkey (free)!
{ 3 comments }

Pumpkin Cheesecake Round-Up

I’ve come up with a few new recipes for Thanksgiving this year, that I’ll post throughout the week.  For today, though, the subject is cheesecake! On my “Vegan Thanksgiving Hotline” (and in my e-mail in-box) there were some questions about pumpkin cheesecake.  As you know, I’m a fan of pumpkin cheesecake — I’ve been making them every year since the mid 1980s when I used to make them for restaurants.  Over the years the recipe has changed somewhat. In my pre-vegan days I used dairy cream cheese, when I went vegan I began using silken tofu, and then when vegan cream cheese came out, that became the “cheese” in the cake!  I only use the non-hydrogenated vegan cream cheese and I love the convenience of it.  It does contain soy, so if you’re soy-intolerant, you can make a thick cashew cream cheese alternative by pureeing soaked cashews with water in a high-speed blender.

For your convenience, I’m re-posting the recipe for Pumpkin Cheesecake with Cranberry Drizzle (from 1,000 Vegan Recipes).  I’ve also included several variations, including my favorite streusel-like topping, as well as my tips for making great vegan cheesecakes.

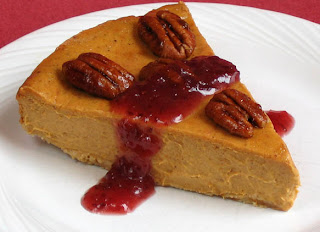
Pumpkin Cheezecake with Cranberry Drizzle
Dense and rich with spiced pumpkin flavor, this dessert is a natural for your Thanksgiving table. The gorgeous orange color offset by the vivid drizzle of cranberry makes a beautiful presentation. I especially like using ground gingersnaps for the crust. From 1,000 Vegan Recipes by Robin Robertson © 2009, John Wiley and Sons.
Crust:
1 1/2 cups vegan ginger snap or graham cracker crumbs
1/4 cup vegan margarine, melted
Filling:
2 (8-ounce) containers non-hydrogenated vegan cream cheese
1 (15-ounce) can solid pack pumpkin
1 cup light brown sugar
1 tablespoon cornstarch
2 teaspoons ground cinnamon
3/4 teaspoon ground allspice
1/2 teaspoon ground nutmeg
Cranberry Drizzle:
1/3 cup cranberry sauce
1 tablespoon pure maple syrup
1 teaspoon melted vegan margarine
1. Make the crust: Preheat the oven to 350ºF.  Grease a 9-inch springform pan. Place the crumbs in the bottom of the pan, add the melted margarine, and mix with a fork to blend. Press the crumb mixture into bottom and sides of pan and set aside.
2. Make the filling: In a food processor, combine the cream cheese and pumpkin and process until blended. Add the sugar, cornstarch, cinnamon, allspice, and nutmeg and process until well blended.
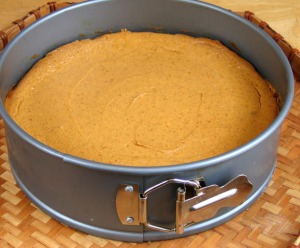
3. Pour the filling into the prepared crust. Bake for 45 minutes. Turn off the oven and leave cheesecake in the oven for another 15 minutes. When done, edges should be golden and starting to pull away from sides of pan, and center should be soft set. Remove the cake from the oven and cool at room temperature for 1 hour. Refrigerate for at least 4 hours before serving or overnight (my preference).
4. Make the topping: In a blender or food processor, combine the cranberry sauce, maple syrup, and margarine and blend until smooth. Pour the mixture into a squeeze bottle or small pitcher and drizzle the over the top of the cheesecake. Keep refrigerated until needed.
5. To serve:  Cut the cheesecake and place each slice on a dessert plate.  Spoon about 1 to 2 tablespoons of the cranberry mixture over the cheesecake slice and onto the plate.  Do not put too much sauce on the cheesecake or it will overpower the pumpkin flavor.

Topping Variations:
Instead of the cranberry drizzle, you can top the cheesecake with any of the following:
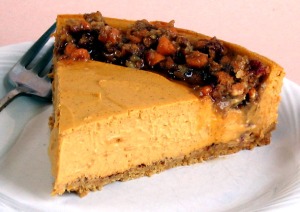
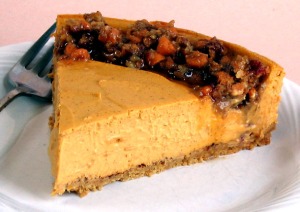
* “streusel-type topping” (shown in top photo): Combine some pecans, dried cranberries, and vegan butterscotch chips in the food processor and pulse them until well chopped.  Stir in a little agave, if desired, to make it easier to use.  Spoon the topping on the outer rim of the cheesecake right after it comes out of the oven so it can melt into the cheesecake a bit. 
* chopped toasted pecans (or other nuts) sprinkled over the entire top or just around the outer edge
* maple-glazed pecan halves
* vegan whipped cream (can be flavored with rum extract)
* crystallized ginger (that has been ground to a powder) lightly dusted around the outer edge of the cheesecake
* chocolate curls

Cheesecake Variations:
Add 1 teaspoon of rum extract to the batter
Add additional spices for a more deeply “spiced” flavor: a combination of ground cinnamon, ginger, nutmeg, allspice, or cloves are good. 
Instead of a gingersnap or graham cracker crumb crust, try crumbs made from shortbread cookies or chocolate cookies.

Cheesecake Tips:
1. Bring cream cheese to room temperature before using.  (Use non-hydrogenated vegan cream cheese.)
2. For best results, make your filling in a food processor or use a stand mixer or electric hand mixer, but don’t use a blender because the mixture is too dense to mix properly.
3. For the crust:  I usually use about 1 1/2 to 2 cups of crumbs for a 9-inch cheesecake.  If you prefer a crisp crust rather than a soft crust, you can prebake the crust for 10 minutes and let cool before adding the filling.
4. When making the crust, add the melted margarine to the crumbs a little at a time — you need just need enough to moisten the crumbs.  Usually 1/4 cup of melted margarine is enough, but it depends on the amount of crumbs you use and also how “dry” they are. For example, when I use ground shortbread cookies (instead of graham cracker crumbs) I find that there’s more moisture in the cookies, so I need to use less margarine.  Sometimes the crumbs are very dry and I need a little extra margarine.
5. Always grease your springform pan (either with margarine or nonstick cooking spray).  Make sure your springform pan is properly closed before using. Place the pan on a baking sheet in the oven to bake.
6. For pumpkin cheesecake, I like to use light brown sugar (which packs tightly into cup).  If you’re using a different sugar, you may want to add extra to make it sweet enough.
7. Before scraping the batter into the crust, taste it — you can add a little more spices or sugar if desired.
8. I usually bake cheesecakes for 45 minutes and then leave them in the oven for a few extra minutes to gently continue cooking.  A few tiny cracks may appear around the edge.  If it overbakes, you may get more cracks.
9. Cool the cheesecake at room temperature for at least an hour, then refrigerate for at least 4 hours.  I prefer to bake it the night before to allow for more chilling time.

{ 5 comments }

Vegan Thanksgiving Hotline

With Thanksgiving just over two weeks away, I’ve been trying to decide what kind of post would be most appreciated by everyone.  A quick check of my blog will reveal that I’m partial to pumpkin cheesecake — especially the version I made last year with the streusel topping — yum!  I’ve been making pumpkin cheesecakes every year for nearly three decades, so I have lots to say on the subject.

Then there’s my favorite Thanksgiving main dish: stuffed seitan.  Over the years, I’ve made it with and without a pastry crust, I’ve used a variety of different stuffings and sauces, and I’ve made it into individual servings like this:

I could give you a recipe for sweet potatoes, mashed potatoes, or cranberry sauce — but you may already have your own favorite.  Maybe you’d like some ideas for a Thanksgiving menu — my Party Vegan cookbook contains two of them — complete with recipes for each course.

Rather than deciding on my own, I think the best ones to ask about what to post for Thanksgiving are the people who read my blog.  So, tell me, what would you most like to see in a pre-Thanksgiving blog post?  The suggestion that turns up in the comments the most will be the topic of my next post.

At the same time, I’ll do my best to answer any Thanksgiving food questions you might have — so let’s call this the “Vegan Thanksgiving Hotline”!

Let’s hear your questions, comments, and suggestions about Thanksgiving.  The lines are open….

{ 1 comment }

The Apple of My Pie…

…or, more correctly, the apple of my “not-pie” — this is one of the luscious baked apples we’ve been enjoying.  Northern Virginia is apple country and there are so many varieties to choose from, it’s hard to decide what to bring home from the various farmstands and orchards in the area.  This week we tried York and Cortland.  I’m sure they’d be wonderful in an actual pie, but I chose to use them in a more virtuous way by baking several of them in my slow cooker.  The flavor is as indulgent as apple pie — without the indulgence.  I’ll be making them again soon.  Next time, I think I’ll stuff them with a little granola to make them reminiscent of apple crisp.  Yum.

Three’s the Charm:  I have lots of good news to share today, I hardly know where to begin.  Let’s start with the amazing honor of having one of my recipes chosen as 1 of 4 “Recipes of the Year” on Vegan.com.  My Singapore-Style Rice Noodles with Tofu and Vegetables was named “Quick Recipe of the Year.”  This recipe happens to be a personal favorite of mine.  Try it yourself and let me know what you think!

Also today, I found out that my Roasted Cauliflower Picatta recipe from my post on One Green Planet was chosen to appear on the Huffington Post! A huge thank you to all who voted for this recipe on One Green Planet.

Good news must come in threes, because, also today, Vegan on the Cheap got a nice shout out in the Philadelphia Daily News, along with my recipe for Tuscan White Bean Pizza appearing on philly.com.

Exciting stuff! Not bad for a Thursday, huh?

{ 0 comments }

Big Vegan Virtual Potluck

When Robin Asbell invited me to participate in a Virtual Potluck for her new cookbook, Big Vegan, I happily agreed.  When I lived in Virginia Beach, I attended many vegan potlucks, but throwing a vegan potluck in my current vegan-scarce area would be akin to a game of solitaire. A virtual vegan potluck online reminded me a little of the old days! 
In trying to decide which main dish recipe to make from Big Vegan, several great choices caught my attention, but I gravitated to one in particular: the Bengali Curry of Cauliflower and Kidney Beans. The recipe title had me at curry, but as I also adore both cauliflower and kidney beans, this dish was especially intriguing.
With a sauce made from pureed onion, coconut milk, and spices, combined with canned beans and cauliflower, the recipe is a harmonious merger of flavors combined with ease of preparation. If you follow my blog, you know that I appreciate recipes that can be made using pantry ingredients and that’s another reason I was drawn to this recipe.  Other than needing to buy cauliflower, I had all the other ingredients on hand.

I strayed somewhat from the recipe in that I sliced and roasted the entire head of cauliflower and then used 2 cups of it for the recipe (adding it near the end of cooking time).  I served it over brown rice and topped it with a hot mango chutney to amp up the heat factor — the dish is actually fairly mild on its own.  Here then, is the recipe for my choice in the Big Vegan Virtual Potluck:
Bengali Curry of Cauliflower and Kidney Beans
This recipe is from Big Vegan by Robin Asbell © 2011, published by Chronicle Books, reprinted with permission.
1 tbsp minced peeled fresh ginger
2 garlic cloves, peeled
1 medium onion, chopped
1 cup coconut milk
1 tsp chili powder
1/2 tsp ground cinnamon
1/2 tsp ground turmeric
1/8 tsp ground cloves
1/8 tsp cayenne
2 cups cauliflower florets
14 oz canned kidney beans, drained and rinsed
1 cup canned diced fire-roasted tomatoes
1/2 tsp salt
1.                  In a food processor or blender, finely mince the ginger and garlic, then add the onion and puree.  Pour in the milk and process.  Add the chili powder, cinnamon, turmeric, cloves, and cayenne and process to mix.  Transfer the sauce to a large frying pan over medium-high heat. Stir the mixture until it starts to bubble, then add the cauliflower and stir to coat it with sauce. Cover the pan and cook until the cauliflower is tender, 8 to 10 minutes.
2.                  Add the beans, tomatoes, and salt, and cook, stirring with the lid off, until the sauce is thick and the beans are heated through. Serve hot.
Serves 4
Thanks again to Robin Asbell for organizing this Virtual Potluck from her new book, Big Vegan.  
{ 0 comments }