≡ Menu

A Bumper Tomato Crop — Not!

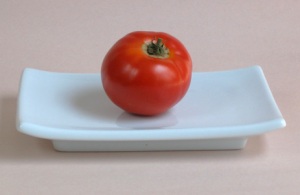
The lone tomato in the above photo constitutes our entire tomato crop this year.  Seriously.  How is this possible, you might ask.  I know it sounds inept, gardening-wise, but here’s what happened…

We’ve always enjoyed growing vegetables, even when we had only a small garden in Virginia Beach, so when we moved to the country a few years ago, we had visions of row after row of all our favorite produce, ripe for the picking. Boy, were we naive.

The first couple of years we managed to grow some decent tomatoes and green beans.  Our herbs were fantastic.  The lettuce, spinach, and other greens were amazing, too — what little we actually got to eat of it.  To the rabbits, deer, and other wildlife who share our property, our vegetable garden was their all-you-can-eat buffet.  The following year was much the same, as we tried to pick at least a small portion of the produce before everyone else got to it.  Then came a drought, and everything basically dried up — even our wonderful blackberries. It was discouraging. (At least I still had some blackberry coulis in the freezer from the previous year’s harvest.)

Long story short, this year we decided we’d had enough of gardening disappointment.  Aside from an herb garden, all we planted were a few tomato plants in pots on the deck.  We figured this was a safe bet since none of the animals really bothered our tomato plants anyway, and they’d be less likely to venture up onto the deck.

Over the last several weeks our tomato plants were doing well.  They greened, grew, and became heavy with tomatoes, a few were just starting to turn red.  Then one day last week I did a double-take.  ALL of the tomato leaves were GONE.  Bitten off, leaving just little stubs of stems.  Looking closer, I saw that some of the tomatoes were bitten into as well.  A bite here and a bite there — just enough to ruin all of them! It seemed like a practical joke. The bite marks didn’t look like they came from any animal I recognized.  Then I saw the culprit, clinging to what was left of one of the plants.  I was too flustered to get the camera and have since missed other opportunities to snap a photo, so I found this photo of the perpetrator online to show you:

A giant green caterpillar like this (only ours is even bigger, if you can believe it) has eaten into all of our tomatoes — all but one. A consolation: we think he is going to metamorphose into a Spicebush Swallowtail (pictured below). On the other hand, it appears that we will never metamorphose into gardeners.
EDIT:  I take back the assumption that it was going to be a Spicebush Swallowtail butterfly.  Knowledgeable readers have informed me that it is probably a tomato hornworm.  Yikes! (although there was no horn on the one I saw).
We plan to feast on our lone tomato this evening.  At least we got one tomato out of our “bumper” crop!  Sometimes it’s those little victories…
UPDATE:  So we ate our lone tomato, and guess what?  It wasn’t even that good.  So go ahead and eat the tomatoes, you caterpillars!  I’ll get mine from the farmer’s market.

{ 0 comments }

Chickpea “Tuna” Salad: A Retrospective and Recipes

I’m going to wax nostalgic today and talk about my first encounter with those illustrious vegan mainstays: chickpea “tuna” salad and tofu “egg” salad.  At the risk of revealing the fact that I’m older than dirt, I can recall eating my first tofu “egg” salad sandwich around 1975 in a little “hippie” café in Woodstock, New York. The place smelled like incense and peppermint and the menu items were all about sprouts and pita bread. Red Zinger tea was the drink du jour. 
Jon ordered the chickpea salad sandwich and we swapped about halfway through so we could enjoy them both. The details stick in my mind clearly because it was my first time in a vegetarian restaurant, and I remember that it felt like I was “home.”  Back then, I was a vegan in heart and mind, but for a variety of reasons, it would be more than ten years before I became 100 percent vegan in practice.  But that first visit to that little café helped me realize that I wasn’t alone. It was one of those “ah-ha” moments.
Fast forward to the mid-1990s, when I published my first cookbook and included recipes for my own versions of a tofu “egg” salad and a chickpea spread. Five years later, a friend of mine added chopped sunflower seeds and kelp flakes to mimic the flavor and texture of tuna salad. The tinkering continued over the years, and the recipe has been evolving ever since.  My latest chickpea spread is very basic — just mashed chickpeas, minced celery, some pickle relish, a little Vegenaise, salt and pepper, and a few shakes of sea vegetable flakes — (just because I like it, not because it actually makes the chickpeas taste like tuna salad!)
Which brings me to another point:  I never liked the taste of eggs or tuna back when I used to eat them!  So I’m suddenly struck with the realization that what I’ve really been enjoying over the years have simply been the flavors of tofu and chickpeas — period.  Not impersonations of “egg” or “tuna.”
These days, recipes for both tofu egg salad and chickpea tuna salad are like the nose on your face — everybody has one!  Like hummus, tofu scrambles, and a few other vegan classics, they’ve been around so long, they’re almost retro now.
And I guess that’s the point of this post.  The other day I made a batch of chickpea salad for a quick lunch, and it tasted just like I remember from that café back in the 1970s.  The more things change, the more they stay the same.
What kind of vegan food memories do you have?

And now, by special request, here are my current favorite recipes for both a tofu and chickpea salad.  Use these recipes as guidelines, adding more of less of the seasonings, according to your own taste.:

Basic Chickpea Salad
Use this salad as a filling for sandwiches or wraps, or spoon it into lettuce leaves, roll up, and enjoy.

1 1/2 cups cooked chickpeas
1/2 cup minced celery
2 tablespoons minced scallion or onion (optional)
1 tablespoon pickle relish
1/2 cup vegan mayonnaise
2 teaspoons fresh lemon juice
1 teaspoon Dijon mustard
1 teaspoon sea vegetable flakes (or kelp or dulse flakes or powder)
Salt and freshly ground black pepper
Mash the chickpeas in a mixing bowl.  Add the celery, scallion (if using), relish, mayonnaise, lemon juice, mustard, and sea vegetable flakes. Season with salt and pepper, to taste. Mix until well combined. Cover and refrigerate at least 30 minutes to allow flavors to blend.
Tofu Salad with Curry
When I make tofu salad for sandwiches, I generally make it with curry to add more flavor and because I used to have an actual curried tofu egg salad sandwich on a restaurant menu where I worked that was pretty good — except for the eggs!  I sometimes add some golden raisins or halved seedless grapes to this. Note: some people like to simmer, steam, or otherwise cook the tofu (and then cool) before using, to make it more digestible.
1 pound extra-firm tofu, drained and pressed
1/2 cup vegan mayonnaise
1/4 cup chopped mango chutney
1 teaspoon prepared mustard (optional)
1 tablespoon hot or mild curry powder
1 teaspoon salt
1/2 cup shredded carrots
1/2 cup minced celery
2 tablespoons minced scallion or onion (optional)
Mash the tofu in a mixing bowl. Add the mayonnaise, chutney, mustard (if using), curry powder, and salt, and stir well until thoroughly mixed. Add the carrots, celery, and scallion, if using, and stir to combine. Refrigerate for 30 minutes to allow the flavors to blend.
{ 2 comments }

Watermelon Hearts with Sweet Mint Pesto

I think the adage about a watched pot never boiling holds true for ripening blackberries as well.  Every day I check on my almost-ripe blackberries and even with the crazy hot days we’ve had recently, they’re still not ripe — almost, but not quite. 

Our mint, on the other hand, is going crazy.  Jon’s been making good use of the crop with copious batches of mint juleps, but I wanted to use some of these fragrant leaves for more than a bourbon delivery system.  So I took a cue from the nearby basil leaves that I’ve been turning into savory pesto, and decided to turn the tables on the whole pesto experience with — ta da — Sweet Mint Pesto!!  What a revelation. 
As you can see from the above photo, my first inclination was to go all fancy and cut out some watermelon hearts.  Place just a little dab of sweet mint pesto onto a piece of watermelon, pop in your mouth, and let the fun begin.  It made me wish watermelons were in season for Valentine’s Day, because they are perfect for shaping into hearts of all sizes and could be used in all sorts of elegant dessert presentations.  But since lots of us have our wedding anniversaries in the summer, I’m sure the idea of heart-shaped watermelon will be getting lots of use.  Here’s the recipe for Sweet Mint Pesto:

Sweet Mint Pesto
1/3 cup unsalted cashews or macadamia nuts
1 teaspoon white chocolate chips (optional)
2 cups loosely packed mint leaves
2 to 3 tablespoons agave nectar
In a food processor, grind the cashews and chocolate chips (if using). Add the mint leaves and 2 tablespoons of the agave and process to a paste.  For a sweeter pesto, add more agave.
Ways to use Sweet Mint Pesto:
·        Serve it alongside watermelon cut-outs (as shown) to dab on top of the melon.
·        Spread the mint pesto on a plain cake, cupcake, or muffin.
·        Add mint pesto to a brownie or cake batter recipe (in place of some of the wet ingredients).
·        Stir almond milk or coconut milk into the pesto to thin it a bit and make a thick creamy sauce:   Add blueberries and toss to coat for: Blueberries in Sweet Mint Cream. Yum.
Speaking of blueberries…. While I’m waiting for my personal supply of blackberries to ripen, I’ve also been having lots of fun with blueberries (even beyond tossing them with the mint cream!). 
I love the combination of blueberries and chocolate, so you know those Chocolate Surprise Brownies from Vegan on the Cheap — the ones made with not only black beans, but also coffee and banana?  Last week I substituted blueberries for the banana (I pulsed the blueberries to a chunky puree) and — wow.  I also tossed some whole blueberries on top of the brownie batter about halfway through baking.  They may not have been the prettiest brownies in the world, but they sure were the tastiest!
{ 0 comments }

Mac and Cheese — Per Your Request!

Yes, your call was heard, dear blog readers! When I posted photos awhile back of some of the wonderful gluten-free meals prepared by Seattle chef, Francis Janes during his family’s visit to our home, many of you e-mailed me asking for the recipes. When I told Francis about it, he gladly shared them with me. So, as requested, here’s his recipe for Mac and Cheese — and I can personally vouch for how delicious it is!

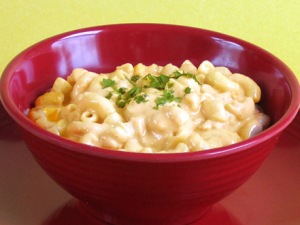
The photo above shows my version of it. I didn’t put the peas in it that Francis calls for in his recipe, but that’s only because I didn’t have any on hand — I love it with this peas added in for extra bursts of color and flavor. I also used regular (not gluten-free) elbow macaroni, because that’s what I had on hand, but wow, I really love the Tinkyada brand brown rice pasta.

This photo shows how Francis made his mac and cheese when he and his family were visiting with us:
As you can see, he topped it with steamed broccoli — a good addition. Okay, now here’s the recipe:
Mac and Cheese
Recipe by Francis Janes, used with permission.
1 (16-ounce) package Tinkyada brand (gluten free) Brown Rice Elbow Pasta
1 medium Yukon Gold potato, peeled and cubed

1 medium carrot, peeled and sliced
1 medium sweet onion, peeled and cut into 1 inch chunks
4 cloves garlic, minced
1 1/2 cup vegetable broth
1 (4-ounce) jar pimentos, drained
Juice of 1 small lemon
3/4 to 1 cup nutritional yeast (recommend Red Star Large Flake)
2 teaspoons sea salt
1 teaspoon onion powder
1 cup thawed frozen petite green peas
Minced fresh cilantro, basil, or parsley, for garnish

Cook the pasta according to package directions. Drain and set aside.
While the pasta is cooking, combine the potato, onion, carrot, and garlic in a medium saucepan. Add the broth and bring to a boil, then reduce the heat and simmer until tender, about 15 minutes.
When vegetables are tender, pour the vegetables and broth into a VitaMix or other high-speed blender. Add the pimentos, fresh lemon juice, nutritional yeast, sea salt, and onion powder and blend on medium speed until smooth.
In a large bowl, combine the sauce with the pasta and green peas. Serve hot, garnished with cilantro or other fresh herb.
Note: For a “baked” style mac and cheese, transfer the mixture to a lightly oiled 9 x 13 inch baking dish and bake for about 20 minutes in a 350 degree oven.

If you try this recipe, be sure to tell me (and Francis) what you think of it!

{ 0 comments }

Farmer’s Market Jackpot

What a haul we got at the local farmer’s market yesterday. I thought I was buying enough to last the week, but it all looked so good that I cooked up most of it yesterday and now, barely 24 hours later, about two-thirds of it is already gone (but not forgotten!).

Dinner last night was chopped zucchini, spring onions, and tomatoes, all tossed with a little olive oil and salt and pepper and roasted until tender. Before serving, I added about a cup of fresh basil and tossed to combine.  It was so delicious.

We also had some of the corn — and it was fantastic!  I often find that the very early corn and the very late corn of the season aren’t all that flavorful, but this stuff was great.  While I had the oven on, I also roasted the little potatoes, ostensibly to use in potato salad tomorrow — but, of course, we had to sample them at dinner, tossed with fresh parsley and a little Earth Balance.  I roasted the beets too, but somehow we managed to leave them uneaten for now — we’ll probably have them with dinner tonight. 

Not shown in the photo is some lovely leaf lettuce that I also got at the farmer’s market, along with peaches and a nice-looking watermelon — a 4th of July tradition at our house.

Hope you all have a happy and safe holiday weekend and be sure to keep the animals inside so they’re not frightened by fireworks!

{ 0 comments }

Rustic Stone Fruit Pie

Whoever came up with the phrase “easy as pie” must have had rustic pies in mind. No fitting in a pie plate or fussy crimping for these pies. No. Just roll out a single crust, pile on the filling, and bring the edge of the crust up over the filling. The more “rustic” looking the better! It tastes just as good as regular pies, without the fuss.

This week I got some cherries on sale, along with the sweetest apricots and plums.  I also got some blueberries (not shown) and seedless black grapes. With so much luscious fruit in the house, I just had to use some of it in a pie. Here’s what I did:

I pulled a single pie crust from the freezer, thawed it, and rolled it out between two pieces of parchment.  After preheating the oven to 400 degrees, I placed the crust (still on the bottom parchment) on a baking sheet (discard the top piece of parchment).  I then spread about 2 tablespoons of lime marmalade on the crust, to add a bit of citrus flavor, but this is an optional step.  For the filling, I combined about a cup of pitted and halved cherries with two apricots and two plums, pitted and sliced.  I tossed in a handful of blueberries, too, just because I had them on hand and I like to add blueberries to just about everything!  You can use any kind of fruit, separately or in combination, in this type of pie.

Over the fruit, I sprinkled about 2 tablespoons of cornstarch and about 1/3 cup sugar (you might need more depending on how sweet your fruit is).  I then stirred gently to combine and piled the fruit in the center of the crust, leaving about a two-inch border all around.  You can go all fancy and arrange your fruit in a pattern if you like, but to me, the idea of a rustic freeform pie is to just toss it together.  The edge of the dough then needs to be gently pulled up over the fruit — I do it in clockwise sections and the dough folds nicely into pleated sections, leaving the center of the pie exposed.  To bake, just sprinkle a little sugar over the whole thing and bake until the crust is nicely browned, about 30 minutes.  Cool before serving.  Here’s what it looks like out of the oven:

As it happens, this is also my Birthday Pie this year, because tomorrow is my birthday and I like pie better than cake!


{ 0 comments }