≡ Menu

Mmm… Migas!

Whether you make your own tortillas or buy them ready-made, there almost always seems to be a few leftover that end up getting dried out. Used to be, I’d feel them to the squirrels, but ever since I started making migas, the squirrels have had to find new snacks.

Made with strips of tortillas, migas are a great way to use leftover tortillas. This popular Tex-Mex skillet dish is traditionally made with eggs and so my vegan version is made with tofu. It’s basically a spicy tofu scramble made with green chiles, salsa, cumin and other seasonings, and, of course, the tortilla strips. I like to top migas with diced avocado and salsa.

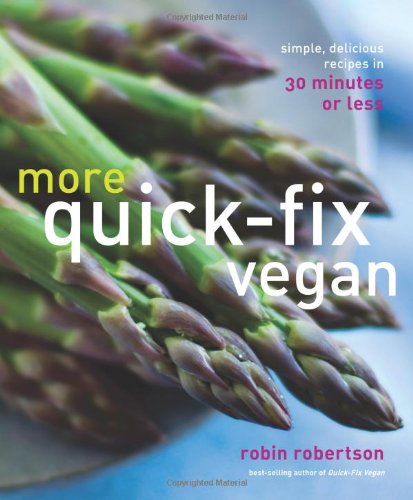
Vegan sour cream and chopped tomato are also good toppings. Migas can be as spicy as you want them to be, depending on your choice of hot or mild salsa and hot or mild green chiles. My fast, easy, and flavorful recipe for Green Chile Tofu Migas will be in my new cookbook, Quick-Fix Vegan, coming out this fall.

In other news….. 
If you follow me on Facebook or Twitter, then you probably know that my book, Vegan on the Cheap has gone back for its fifth printing.

I’m also excited to report that VOTC is being recommended by Kathy Freston. In what she calls “The Budget Veganist,” on Facebook, she’s posted some recipes from VOTC (Tuscan White Bean Pizza and Almost-Instant Chickpea-Tomato Soup, so far), stating: “I hear people sometimes saying that eating vegan is expensive, but that’s just not the case! Here are some of my favorite recipes from Robin Robertson, from her terrific cookbook Vegan on the Cheap. Each recipe seen here from Robin is less than $1/serving!”

Coming soon…
Some tasty ways to celebrate St. Patrick’s Day — and — another cookbook giveaway!


{ 0 comments }

Spicy Cauliflower (Gobi Manchurian)

Several years ago I had my first encounter with Gobi Manchurian, a fabulously spicy and flavorful Indian cauliflower dish.  It was on the appetizer menu of my then-favorite Indian restaurant where the chef took extra care to provide lots of vegan menu options. On that menu it was listed simply as “Spicy Cauliflower.”  (The restaurant has since closed and I’ve moved away.)

Because the food was so outstanding, I frequently asked the chef to explain how he made certain dishes, the cauliflower among them.  I diligently scribbled his instructions on a cocktail napkin and have been trying to recreate the magic of his recipe ever since.  My attempts have been good, but not quite “it.”  It’s at least as good as most Gobi Manchurian I’ve had in subsequent restaurants, but it still needs a little tweaking to equal the nuances that chef put into his dish.
So, here’s my latest attempt.  In this version, I roast the cauliflower before frying it to give it more flavor than simply steaming it.  I’ve also tweaked the seasonings both in the batter and in the sauce.  It’s as close as I’ve gotten so far and about 95% where I want it to be — crispy on the outside, tender in the center, with lots of flavor and heat.   Even if you’re not a fan of cauliflower, you just may like it prepared this way (as long as you like spicy-heat). 
If you try this recipe, please let me know what you think.  And if anyone has suggestions on how I can achieve that elusive 5% to make this as perfect as my memory of it, I’d love to hear your ideas.
Spicy Cauliflower (Gobi Manchurian)
With 1/2 teaspoon cayenne and 2 teaspoons Sriracha, this is pretty hot stuff. If you want it a little milder, cut back on the amount of cayenne.

1 head cauliflower, cored and cut into 1/2-inch slices
Salt and black pepper
1/2 cup chickpea flour (besan)
1/4 cup plus 2 tablespoons corn starch
1/4 cup all-purpose flour
1 teaspoon ground coriander, divided
1/2 teaspoon cayenne, divided
5 tablespoons soy sauce, divided
1/2 cup water
1 tablespoon neutral vegetable oil, plus more for frying
1 medium yellow onion, minced
2 garlic cloves, minced
2 teaspoons freshly grated ginger
2 teaspoons rice vinegar
2 teaspoons Sriracha sauce
1 teaspoon toasted sesame oil
1/2 teaspoon sugar
3/4 cup tomato puree
1/4 cup minced fresh cilantro
Preheat the oven to 425 degrees F. Arrange the cauliflower on an oiled baking sheet, season with salt and pepper to taste, and roast until just tender, turning once, 12 to 15 minutes total. Remove from the oven and set aside. Reduce the oven temperature to 325 degrees F.
In a bowl, combine the chickpea flour, cornstarch, and all-purpose flour. Add 1/2 teaspoon of the coriander, 1/4 teaspoon of the cayenne, and 1/4 teaspoon each of salt and black pepper. Stir in 2 tablespoons of the soy sauce and the water and mix well to make a batter. Add another tablespoon or so of water if the batter is too thick.
In a large skillet, heat a thin layer of oil over medium-high heat. Working in batches, dip the cauliflower in the batter, then arrange in the hot skillet. Fry until golden brown, turning once, 4 to 5 minutes total. Transfer the cooked cauliflower to the baking sheet and return to the oven to keep warm.
Heat the 1 tablespoon oil in the same skillet over medium-high heat. Add the onion and cook until softened, about 5 minutes. Add the garlic, ginger, 1/4 teaspoon salt, the remaining 1/2 teaspoon coriander, and remaining 1/4 teaspoon cayenne, and cook 1 to 2 minutes. Stir in the 3 tablespoons soy sauce, vinegar, Sriracha, tomato puree, sesame oil, and sugar. Add 3 tablespoons of the cilantro and cook, stirring, until the sauce is thickened and the flavors have blended, about 5 minutes. Add up to 1/4 cup of water is the sauce is too thick. Taste and adjust the seasonings.
Return the fried cauliflower to the pan and spoon on the sauce to coat, turning the cauliflower gently to coat with sauce. Serve immediately. Garnish with the remaining 1 tablespoon cilantro.

{ 3 comments }

Bananas Foster Waffles

I haven’t seen my waffle maker since I moved from Virginia Beach in 2007.  It’s probably in a box in the attic somewhere, who knows.   I haven’t really missed it. In fact, I’m actually kind of relieved that it hasn’t been around.  It’s just one less temptation.  See, the thing about waffles is that if you’re going to bother making them, then you have to eat them.  And they’re so delicious, it’s hard to stop eating once you start.  So, out of sight, out of mind.  Since I don’t see the waffle maker beckoning me with its “come hither” look, I don’t think about waffles much.  Most of the time.

Then the other day I read that a common supermarket brand of waffles had some vegan varieties.  Wouldn’t you know that when I went grocery shopping the next day, my eyes fell on a box of Van’s (vegan) waffles — the very same waffles I just read about.  Surely, it was fate.  What else could I do but bring home the waffles?

These are some great little frozen waffles. I love their size and the fact that you can make them in a toaster. So easy, so quick. To celebrate my long waffle hiatus, I wanted to do something special with them beyond the usual drizzle of maple syrup. Since Jon had put in a request for Bananas Foster, the solution was crystal clear: Bananas Foster Waffles!

“Easy to make” is an understatement. Just cut a pint of your favorite vegan ice cream into cross-wise slices and wrap in plastic wrap, flattening it as needed to be the same circumference as your waffles, then refreeze. Toast the waffles.

While the waffles are toasting, make the banana topping: Cut 3 bananas into 1/4-inch slices and set aside. In a skillet, combine 1 tablespoon Earth Balance, 1/2 cup pecans (halves or pieces), and about 2 tablespoons light brown sugar or maple syrup over medium heat. Cook, stirring, until the Earth Balance melts and the sugar dissolves. Add the reserved banana slices and cook until softened but not mushy, about 1 minute. Carefully pour in 3 to 4 tablespoons of brandy or dark rum and cook for another minute or two.

To assemble: unwrap the frozen ice cream slices and place one between two toasted waffles (or you can just use one waffle per serving, placing the ice cream on top of the waffle). Arrange on large dessert plates or in large shallow bowls. Spoon the hot banana mixture on top and serve immediately.

This made a sublimely decadent brunch/dessert.  It’s totally scrumptious but very filling.  We actually split the portion shown in the photo and it was more than enough, so I’d recommend just using one waffle per serving.
IN OTHER NEWS….For those of you who don’t follow me on Facebook and/or Twitter (hint, hint…), I’m excited to tell you that my cookbook 1,000 Vegan Recipes was included on the “Vegan Bucket List” in the March/April issue of VegNews.  I couldn’t be more thrilled about such an honor!

One more thing…If you haven’t done so already, I suggest you buy a copy of A Vegan History by Erik Marcus.  It’s the best $2.99 you’ll ever spend if you want to have a clear concise history of the vegan movement from its early days to the present.  Best of all, if you don’t have Kindle, there are lots of other ways to download it (I downloaded my copy directly to my computer).

{ 0 comments }

Portobello Brasciole

As happens occasionally, yesterday I found myself craving the flavors of my mom’s brasciole.  Even as a child I’ve had a love-hate relationship with brasciole because I never liked the taste (or idea) of the beef it was made with but I loved the flavor of the garlicky seasoned bread crumbs on the inside and the marinara sauce on the outside. 
I’ve made vegan brasciole before, but usually with seitan and sometimes with eggplant.  This time I wanted to see if I could make it with Portobello mushrooms. And it worked!
The first and obvious challenge was to get the mushrooms to be flat and soft enough to stuff and roll up.  After scraping the gills out, I placed each mushroom between two sheets of plastic wrap and pounded it flat.  I then put the mushrooms in the microwave for just a few seconds to soften them.  I then sprinkled them with minced garlic, parsley, raisins, breadcrumbs, salt, and pepper, and rolled them up.  To keep them from unrolling I tied the rolls in two places with kitchen twine and then pan-seared them until nicely browned and cooked through.  Topped with marinara sauce, the flavor and texture was all the things I loved about mom’s original and none of the things I didn’t.
To serve alongside the brasciole, I had some nice baby arugula on hand so I made a double batch of Pan-Fried Arugula Pesto from Party Vegan to toss with some pasta.  As I say in the book, raw garlic and arugula can both be assertive and pan-frying them for a couple minutes keeps their great flavors, but just mellows them out a little.  I also added the walnuts to the skillet to toast them a little before using in the pesto. After cooking for about 2 minutes, I let the mixture cool for a minute and then process it in the food processor with salt and pepper, and a splash of water to smooth it out a little.
I had some arugula left after making the pesto, so I sauteed it with garlic and hot red pepper flakes to serve on the side.  The verdict:  This meal is going to be in regular rotation at our house — it was sooo good!  In fact, we liked it even better than the seitan or eggplant version.I think my mom would have enjoyed the new version of her brasciole recipe. It occurs to me that my mom didn’t live long enough to taste a Portobello mushroom — she died before they became an everyday ingredient.  I think she would have liked them — especially in her brasciole recipe!  
{ 2 comments }

Happy Valentine’s Day + Cookbook Winner!!

Gary is a sucker for Valentine’s Day — well, at least for a Valentine’s Day balloon!  A few years ago when this photo was taken, this balloon was in the living room and I was in my office.  Out of the corner of my eye, I suddenly see the balloon coming through the door towards me at my desk, seemingly under its own power.  I looked down to see Gary with the balloon’s ribbon in his mouth walking over to me.  He was bringing me the Valentine’s Day balloon!  Now that’s a sweet cat!  (By the way, please excuse Gary’s goofy expression — I think his lip got hooked on his tooth.)

I want to wish everyone a Happy Valentine’s Day.  Whether you celebrate it or not, I just think it’s a great day to think about love.  To me being vegan is all about love:  Love for animals.  Love for our planet.  And love for ourselves and our family and friends by eating a healthy diet. 

Cookbook Giveaway Winner:  It was fun to read how everyone plans to celebrate Valentine’s Day — thanks to all who participated in the giveway!  The mighty Random.org random number generator has chosen one lucky winner of a copy of Vegan Fire and Spice and two coupons for free So Delicious products.  The winner is:  “Matthew” — congrats!!! Matthew, please e-mail me with your mailing address and I’ll get the book and coupons right out to you.

BONUS WINNER:  In reading through the comments, I noticed that J has no kitchen while her new kitchen is being installed.  Having gone through that myself a few years back, I couldn’t have done it without the recipes in Vegan Unplugged. So….”J“, please send me your address and I’ll send you a copy of Vegan Unplugged so you can cook yummy vegan food without a kitchen!

Happy V(egan) Day, everyone from me…and Gary!

{ 0 comments }

More Amore…and cookbook giveaway reminder!

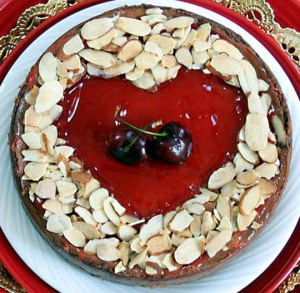
Before all these frilly hearts give you the wrong idea, let’s set the record straight. I’m really not much into Valentine’s Day — I just like playing with food. I love planning heart-shaped and/or red menus for February 14 much in the same way that I’m not Irish but I like to make soda bread and corned seitan and cabbage for St. Patrick’s Day.

As promised, I want to share some more ideas for Valentines Day. I’ll be making the spicy menu in the previous post, but if you’d like something more fancy (think “seitan and puff pastry”), consider the special Valentine’s Day dinner menu in Party Vegan:

~Valentine Dinner for Two~
Chickpea-Artichoke Bites with Rosemary Aioli
Red Bliss Potato and Fennel Soup
Pastry-Wrapped Seitan with Spinach-Mushroom Duxelles
Heart-Beet Rosti
Sauteed Rainbow Chard with Balsamic Drizzle
Chocolate Cherry Cheesecake

The dessert for both menus is the chocolate cheesecake you see in the photo. But it’s made with different toppings for each menu — the operative words in this dessert are “chocolate” and (vegan) “cheesecake” — but you can top it any way you like. Below is the recipe for the regular version, with cherries and toasted sliced almonds. If you can’t get enough chocolate, you could top it with chocolate curls and/or a drizzle of chocolate sauce.

If I had to choose another favorite V’day dinner idea (besides the seitan roulade and spicy comfort loaf, that is) it would be a heart-shaped vegan pizza. It’s easy and fun to make, and you can garnish it with different toppings to suit the theme: heart-shaped slices of vegan pepperoni, or maybe roasted red pepper strips that spell “I LUV U”, etc.

For an easy appetizer, make these tapenade hearts using a sheet of puff pastry, a small heart pastry cutter, and some storebought sun-dried tomato tapenade. (Sun-dried tomato tapenade makes a yummy pizza topping, too.)

As an alternative (and quick) but still special dessert, just scoop some vegan ice cream into pretty glasses and top with chocolate sauce or liqueur (I like Frangelico), toasted nuts and red berries. Now about that cheesecake…

Chocolate Cherry Cheesecake
The recipe is from Party Vegan by Robin Robertson © 2010 John Wiley and Sons. It makes one small cheesecake or two to three individual-sized cheesecakes.

3 tablespoons vegan margarine
1 to 1 1/4 cups chocolate cookie crumbs (I use Newman’s Own cookies and grind them in a food processor)
2/3 cup semi-sweet vegan chocolate chips
2 (8-ounce) containers vegan cream cheese, at room temperature
3/4 cup sugar
1/4 cup non-dairy milk
1 teaspoon pure vanilla extract
1/3 cup fruit-sweetened cherry jam
1/4 cup toasted sliced almonds
Fresh pitted cherries, for garnish
Chocolate curls (optional)
1. Preheat the oven to 350°F. Melt the margarine in a small saucepan and set aside. Lightly grease the bottom and sides of a 7-inch springform pan and set aside.
2. Place the cookie crumbs in the prepared pan and drizzle in as much of the melted margarine as needed to moisten the crumbs, mixing with a fork to combine. Press the crumb mixture into bottom and sides of pan, and set aside.
3. Melt the chocolate in a double-boiler or microwave and keep warm.
4. In a food processor, combine the cream cheese, sugar, soy milk, and vanilla, and blend until smooth. Add the chocolate and blend until smooth. Scrape the batter into the prepared crust and spread it evenly. Bake until firm, about 40 minutes.
5. Turn off the oven and let the cake remain in the oven for 10 minutes. Remove the cake from the oven and cool on a wire rack. Refrigerate several hours to chill completely.
6. When ready to serve, place the cherry jam in a small bowl and stir briskly until smooth. Spread the jam thinly over the top of the cheesecake. Sprinkle the toasted almonds on top and garnish with fresh cherries. Top with chocolate curls, if using.

COOKBOOK GIVEAWAY REMINDER: Be sure to leave a comment at the end of the previous post to be entered in the giveaway to win a copy of Vegan Fire and Spice. As a little something extra, I’ll be including 2 coupons for FREE So Delicious products (including coconut milk and their yummy vegan ice cream). So, if you haven’t entered yet, do it NOW. The winner will be chosen at random and announced on Monday, February 14.

{ 1 comment }