≡ Menu

Berry Cobbler

It happens every year. Without planning, it always seems that I use up the last bit of frozen blackberries from the previous season right around the time when the new season’s berries are making their way towards ripeness.

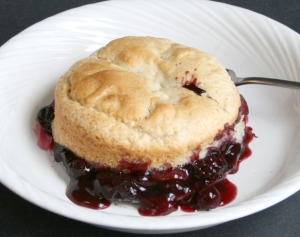
In the last few days, a huge volume of flowers on my old tangle of blackberry bushes have given way to an equally prodigious amount of green berries that should begin to ripen in a couple weeks. As if on cue, I combined my last bag of frozen berries with some fresh blueberries and strawberries to make a berry cobbler. The single remaining container of blackberry coulis in the freezer will no doubt be enjoyed in the next few weeks, just as we prepare to pick berries and start the delicious cycle all over again.

This berry cobbler is a variation on the Mixed Fruit Cobbler recipe from Vegan on the Cheap. The original recipe uses peaches, plums, and pineapple, but as I say in the headnote, you can substitute any fruits you prefer, so I did an all-berry version.

Instead of making the cobbler in the usual baking dish, this time I made individual cobblers in mini-springform pans. After baking and cooling for a few minutes, I placed each mini-cobbler in a shallow bowl and removed the sides of the springform pan. It makes a cute presentation this way and, as with any cobbler, is even better when served warm with a scoop of vegan vanilla ice cream. Here’s the recipe:

Mixed Fruit Cobbler
Use whatever fruit combination you wish — you should have about 4 cups of fruit filling total.
(Recipe from Vegan on the Cheap by Robin Robertson © 2010, John Wiley and Sons.)

3 to 4 ripe peaches, peeled, halved, pitted, and chopped
3 ripe plums, peeled, halved, pitted, and chopped
1 (15-ounce) can pineapple chunks, drained, reserving 2/3 cup juice
1 1/2 cups all-purpose flour
1/2 cup sugar
1 1/2 teaspoons baking powder
1/2 teaspoon salt
1/3 cup vegan margarine, melted
1 teaspoon pure vanilla extract

1. Preheat the oven to 350°F. Grease a 9-inch square baking dish. Combine the peaches, plums, and pineapple in the bottom of the prepared dish and set aside.
2. In a medium bowl, combine the flour, sugar, baking powder, and salt. Stir in the pineapple juice, margarine, and vanilla and mix until well blended.
3. Drop the dough onto the filling with a large spoon to cover. It’s okay if it’s uneven: rustic is good. Bake until the topping is golden brown and the fruit filling is bubbling, about 50 minutes. Serve warm.

Tips and Variations:

1. If your fruit is less than perfectly sweet, mix about 2 tablespoons of sugar into the fruit. (You can also add 1/2 teaspoon or so of cinnamon or other spice, if you want to.)

2. If you prefer your fruit filling to be more “saucy” than “juicy” sprinkle on a heaping teaspoon of cornstarch when you add the sugar and mix in to coat the fruit.

3. When you spoon on the topping, keep it thin near the middle of the cobbler so that it bakes all the way through.

{ 0 comments }

Asheville, NC: My Kind of Town

We just returned from a wonderful trip to Asheville, North Carolina. I had always heard great things about Asheville and wanted to visit it for years. Last week we finally went, and it exceeded my expectations in every way. Surrounded by dramatic mountains and home to the famed Biltmore Estate, Asheville is artsy-craftsy, progressive, and a great destination with lots to see and do. It’s also extremely vegan-friendly.

The downtown area is filled with fun and funky shops and diverse restaurants. Our favorite veg restaurant was the Laughing Seed, where we enjoyed a great house-made seitan sandwich on focaccia for lunch. For sides, I had the orzo salad and Jon got the jalapeño-onion fries. We went back for dinner the next day to try the bourbon-pecan seitan (served with potato gratin and marinated green beans) and were glad we did.

There are several great Thai restaurants in Asheville, and we especially enjoyed Kanpai Sushi-Thai which serves a great selection of vegan sushi that we enjoyed along with some Thai favorites. Among my favorite sushi rolls were the mango-basil roll and the tempura sweet potato roll. We had a great meal of Indian street food at Chai-Pani, where we feasted on uttapam served with sambar and coconut chutney and a refreshing bhel puri made with puffed rice, chickpea noodles, cilantro, and tamarind chutney. At a Jamaican restaurant called Nine-Mile, many of the dishes can be prepared vegan and the jerk tofu is really good.

We stayed at a lovely bed and breakfast called the Lion and Rose in the historic Montford area of town. The owners, Jim and Linda Palmer, were gracious and wonderful hosts who are very accommodating to vegans and other special dietary needs, such as gluten-free. Jim is a terrific cook and took great care to prepare breakfasts for us that were every bit as delicious and satisfying as the non-veg counterparts. We especially enjoyed getting to know Jim and Linda’s adorable dog, Cedric, who loves getting belly rubs. Here’s a photo of the inn:

We came home feeling rested and relaxed and very happy to have discovered this true gem of a town nestled in the mountains of western North Carolina.

Here are just a few photos of the food we enjoyed:

Tofu coconut curry with sweet potatoes and cashews:

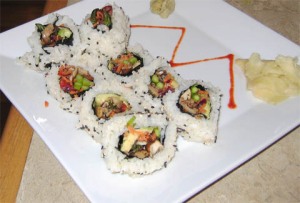
This sushi roll was filled with avocado, asparagus, oyster mushrooms, and other goodies:

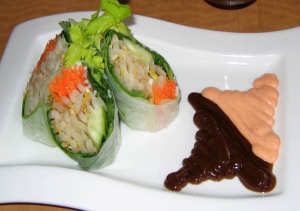
Spring roll with two sauces:
 
There would be more photos, but I was too busy enjoying Asheville to stop and take pictures!
{ 0 comments }

By Popular Demand: Quick Lo-Mein

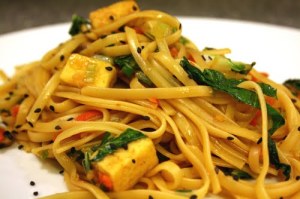
By a slim margin, Quick Lo-Mein was voted the recipe from Vegan on the Cheap you’d most like to see. I can’t help but think voters were swayed by this luscious looking photo taken by Tami at Vegan Appetite.  But, in addition to being photogenic, I think this recipe is a good choice because it’s versatile, easy to make, delicious, and, of course, inexpensive  Here are just some of the ways this recipe can help you eat “on the cheap”:

1. It doesn’t call for any exotic ingredients, so you should be able to make it with what’s on hand.

2. It’s a great way to use up leftover spaghetti or linguine, as you only need about 4 cups of cooked pasta for this recipe. (You can even use reconstituted ramen noodle bricks if you have them on hand. Just throw away the seasoning packets, break the bricks into pieces, and place them in a heatproof bowl. Cover them with boiling water and set aside to reconstitute.)

3. You can easily swap out different vegetables according to what you have in the fridge. Instead of (or in addition to) the cabbage, you could use broccoli, snow peas, green beans, etc. If you have leftover steamed veggies, this is a great way to use them.

4. The recipe makes about 4 servings, but can be easily stretched by adding extra noodles or veggies, in which case you’ll want to double the sauce ingredients so there’s enough to coat everything.

5. Instead of tofu, you could instead add seitan or tempeh — or leave them all out in favor of more vegetables.

MORE WAYS TO WIN: There are two more opportunities to win a copy of Vegan on the Cheap. The first is at Savvy Abby, the new VegNews blog with money-saving tips (where I did some guest posting this week). Here’s the link to the giveaway where you will also find some of my Cheap tips and recipes. For yet another chance to win a copy of the book (and see another recipe), visit PETAPrime.

Now, here’s that lo-mein recipe:

Quick Lo-Mein

Recipe from Vegan on the Cheap by Robin Robertson © 2010, John Wiley and Sons.

16 ounces extra-firm tofu, drained and pressed
1 tablespoon cornstarch
Salt
2 tablespoons canola or other neutral oil
2 garlic cloves, minced
2 teaspoons grated ginger
1 medium carrot, shredded
4 to 5 scallions (green onions), chopped
4 cups shredded green cabbage (or  napa cabbage or bok choy)
1 1/2 cups sliced mushrooms
3 tablespoons soy sauce
1 tablespoon rice vinegar
1 tablespoon ketchup
1 teaspoon toasted sesame oil
4 cups cooked spaghetti or linguine (or reconstituted ramen)

1. Cut the tofu into 1/2-inch dice. Toss with the cornstarch and 1/4 teaspoon of salt and set aside.
2. Heat 1 tablespoon of the oil in a large skillet over medium-high heat. Add the tofu and cook until golden brown all over, about 7 minutes. Remove from the skillet and set aside.
3. Add the remaining oil to the same skillet over medium-high heat. Add the garlic, ginger, carrot, scallions, cabbage, and mushrooms. Season with salt and stir-fry to soften, 4 to 5 minutes.
4. Stir in the soy sauce, rice vinegar, ketchup, and sesame oil. Add the reserved tofu and the cooked noodles. Toss to combine, adding a bit of water (or extra sauce) if the mixture is too dry. Taste and adjust the seasonings. Serve hot.

Note: Enjoy as is, or garnish with regular toasted or black sesame seeds or chopped parsley or cilantro. For a spicy version, add a drizzle of sriracha.

{ 0 comments }

Vegan on the Cheap Tester Photos… and a Question

Here’s the final installment of my favorite tester photos for Vegan on the Cheap. These lovely pics were taken by Tami at Vegan Appetite. That’s Quick LoMein in the top photo.

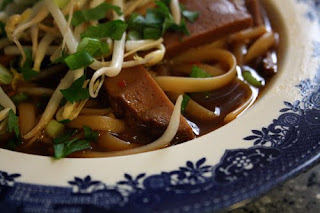
This is Asian Noodle Soup:

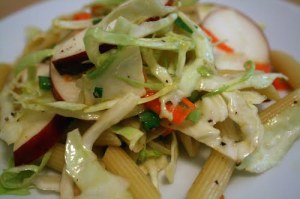
Here’s a photo of Pasta Slaw:

This one’s Nacho Taco Salad:

Here’s Minestrone Soup with Tiny “Meatballs”:

And the last one is Seitan Goulash:

To see more great VOTC photos taken by Tami, visit her blog, Vegan Appetite. You’ll want to go to her blog for another reason too: she’s currently doing a great giveaway of Vegan on the Cheap. For your chance to win, just leave a comment on her post with your favorite money-saving tip. And while you’re there, read the other tips that are posted — lots of great ideas!!

Now to my question. I’d like to share another recipe from Vegan on the Cheap and I can’t decide which one. So I’ll leave it to you to tell me.

What kind of recipe would you like to see posted next? A soup or salad? Maybe a skillet dish, sandwich, or pasta recipe? Something for the slow cooker or oven? A dessert?

Be as general or specific as you like — for example, you can ask for the recipe for one of the tester photos I’ve been posting these last few weeks. Whichever recipe (or type of recipe) gets the most votes will appear in a post by the end of next week.

P.S. If you already have the book, you can “play” too — list your favorite recipe so far or pick one that you think others would enjoy.

{ 0 comments }

Tuscan White Bean Pizza

The stunning pizza photo was taken by Matt over at No Meat Athlete who recently blogged about my recipe for Tuscan White Bean Pizza from Vegan on the Cheap.  The main thing I like about this pizza recipe is that it allows you to enjoy a healthy and delicious pizza without the need for cheese of any kind. Sure, there are some tasty vegan cheese products out there, but they can be high in fat and expensive.

The idea of cooking vegan “on the cheap,” is to make great-tasting healthy food without using expensive products. That’s where using a creamy garlicky bean topping on the pizza comes in: it’s low in fat, high in protein, and, best of all, it’s cheap to make.  The topping isn’t meant to mimic cheese in any way, it just makes for a satisfying and delicious pizza.  In the recipe, I also use sliced tomatoes and basil as toppings, with the suggestion of sliced pitted kalamata olives added if you want to “splurge a little.”

Of course, there’s no need to stop with the basic recipe (below). Favorite pizza toppings are a very personal matter and limited only by your own preferences and imagination. So why not let this idea inspire you to come up with your own creative pizza variations. Here are some of my favorites to get you started:  (Keep in mind that certain toppings, such as olives and artichokes, are pricier than others and will add to the cost of the pizza.)

Pizza topping ideas:
vegan pepperoni slices (recipe in Vegan on the Cheap)
roasted or grilled vegetables
tossed baby greens salad with a light vinaigrette
crumbled vegan sausage and marinara sauce (recipes in Vegan on the Cheap)
sliced artichoke hearts and tofu feta (recipe in Vegan on the Cheap)
hummus, sliced tomatoes, and sliced pitted kalamata olives

Some suggested variations from Matt’s post include adding a splash of lemon juice to the white bean mixture for a bit of acidity, (although the sliced tomatoes do that too.) I also like the idea of using white whole wheat flour, but you can use anything from regular all-purpose flour, to half whole-wheat/half a.p. flour, to your favorite gluten-free flour blend. Another suggestion is to add some dried herbs to the flour mixture when making the crust for added flavor. Of course, you can always just make the recipe as is. And for something completely different, try the Polenta Pizza with Roasted Vegetables (also in Vegan on the Cheap.) 

Do you have any other great pizza ideas you’d like to share?

Tuscan White Bean Pizza
Makes 1 (12-inch) pizza
(Recipe from Vegan on the Cheap by Robin Robertson © 2010, John Wiley and Sons.)

Dough:
2 3/4 cups all-purpose flour
2 1/4 teaspoons instant yeast
1 teaspoon salt
1 cup lukewarm water
Topping:
2 tablespoons olive oil
3 garlic cloves, finely minced
1 1/2 cups cooked or 1 (15-ounce) can cannellini beans, drained and rinsed
1/4 teaspoon salt
1/4 teaspoon freshly ground black pepper
1/3 cup water or vegetable stock
3 tablespoon chopped fresh basil leaves
2 ripe plum tomatoes, thinly sliced

1. Make the dough: In a large bowl, combine the flour, yeast, and salt. Stir in the water until combined then use your hands to knead it into a soft dough.
2. Transfer the dough to a lightly floured work surface and knead until it is smooth and elastic, about 10 minutes, adding additional flour as needed so it doesn’t stick. Shape the dough into a smooth ball and place in an oiled bowl. Cover with plastic wrap and let rise at room temperature in a warm spot until double in volume, about 1 hour.
3. After the dough has risen, transfer it to a lightly floured work surface, punch it down and gently stretch and lift it to make a 12-inch round about 1/4-inch thick. Transfer the round to a floured baking sheet or pizza stone. Let the dough rise in draft-free place for 20 minutes. Adjust the oven rack to the bottommost position of the oven. Preheat oven to 425 degrees F.
4. Make the topping: In a large skillet, heat the oil over medium heat. Add the garlic and cook until softened, about 2 minutes. Add the beans, salt, and pepper.
5. Mash the beans to break them up, then stir in the water and simmer, stirring occasionally, until the mixture is creamy, about 8 minutes. Stir in the basil and set aside.
6. To assemble the pizza, spread the bean mixture evenly on top of the dough round, to within 1/2-inch of the edge. Arrange the tomato slices on top and season with salt and pepper to taste. Bake until the crust is browned, 12 to 15 minutes. Serve hot.

Splurge a little: Add sliced pitted kalamata olives when you add the tomatoes. Garnish with thin strips of fresh basil leaves.

More Vegan on the Cheap sightings:

Another gorgeous photo by Mackenzie Mollo posted on Vegan.com.  This time, it’s the Tiramisu Bread Pudding.

A lovely notice on GoDairyFree.org.  Thank you Alisa!

And the Vegan on the Cheap cook-through over at Two Vegan Boys is still going strong.  Great job, Krys!

{ 0 comments }

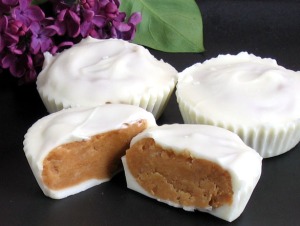
White Chocolate Peanut Butter Cups

If you’re a fan of peanut butter and white chocolate, this post is for you. I confess to not having much of a sweet tooth, but when these little temptations are around, I usually cave. You can make them with regular semi-sweet (vegan) chocolate if you prefer and you can even use almond or cashew butter instead of peanut butter.  They’re all good.

If you need an excuse to make these treats, they make a great “homemade” gift for Mother’s Day. Or you could just make some to celebrate Spring!

Here’s the recipe:

White Chocolate Peanut Butter Cups

1/2 cup Earth Balance
1 cup creamy peanut butter
1/2 teaspoon pure vanilla extract
3/4 cup confectioners’ sugar, or more
12 ounces vegan white chocolate chips

1. Melt the Earth Balance in a medium-size saucepan over low heat. Stir in the peanut butter and vanilla until well blended. Remove from the heat and stir in the sugar. Mix well until thoroughly combined, then refrigerate while you melt the chocolate.
2. Place the chocolate chips in a heatproof bowl and set it over a saucepan of simmering water until melted. (Note: if your white chocolate isn’t melting smoothly, add a drop or two of neutral vegetable oil.)
3. Use a small brush to coat the chocolate over the bottom and about 1/2 inch up the sides of 12 paper cupcake liners. Refrigerate the cups until firm, about 10 minutes.
4. The peanut butter mixture should be firm. If it isn’t, incorporate a bit more confectioner’s sugar, a little at a time. Scoop out about 2 tablespoons of the peanut butter mixture and shape into a ball. Flatten the ball into a disc and place inside one of the chilled chocolate-lined cups. Repeat until all the cups are filled.
5. Spoon about 2 teaspoons of the remaining melted chocolate over the top of each cup. Refrigerate until firm.

{ 0 comments }